PST files let you access email data in an email client without an internet connection. For migrating from PST to Office 365, you may need to know how to import PST to Office 365 email accounts so that users can see their old email data in the web interface of Outlook Online. Outlook Online is the web-based email app in Office 365.
There are several manual ways to do this, each with its own use matter. Here, we’ll look at just the manual Azure AzCopy utility that imports PST files to Office 365 and sees what it can and can’t do. If this doesn’t meet users’ needs because it’s hard to do, professional software is here to import PST to Office 365 hassle-free.
With Azure AzCopy, import PST files to Office 365:
If you need to import several mailboxes, you can either upload them to Azure storage or use the drive shipping service from Microsoft. The network upload is free, but it may take a long time to send the files.
Also, shipping a hard drive will cost you about $2 per GB of data. So, that can get pretty expensive, but it’s not a very poor option if you need to import a couple hundred mailboxes or more.
Preparation for this process:
Before we can import PST to Office 365, you will have to consider giving the Exchange Online Global Admins the Mailbox Import/Export role. Regrettably, this change might not be made for up to 24 hours.
You can get permission to set up the roles and permissions you need through the link: https://admin.exchange.microsoft.com/.
- Go to Permissions.
- Open the Organisation Management role in the admin roles.
- To add a role, click the plus sign (+).
- Choose the Mailbox Import/Export role. Click Save.
Now, Microsoft claims that the change can take up to 24 hours, but in my case, I was able to do a new Import Job after 5 minutes. Just sign out, close all Microsoft tabs, and sign back in.
Getting the process started:
So with the permissions set, we can form a new Job to import PST to Office 365. Go to https://protection.office.com/ and click on “Import” under “Information governance.”
- Choose Import PST Files
- Hit on New Import Job
- Select if you desire to upload or ship your PST data.
- Now Upload it

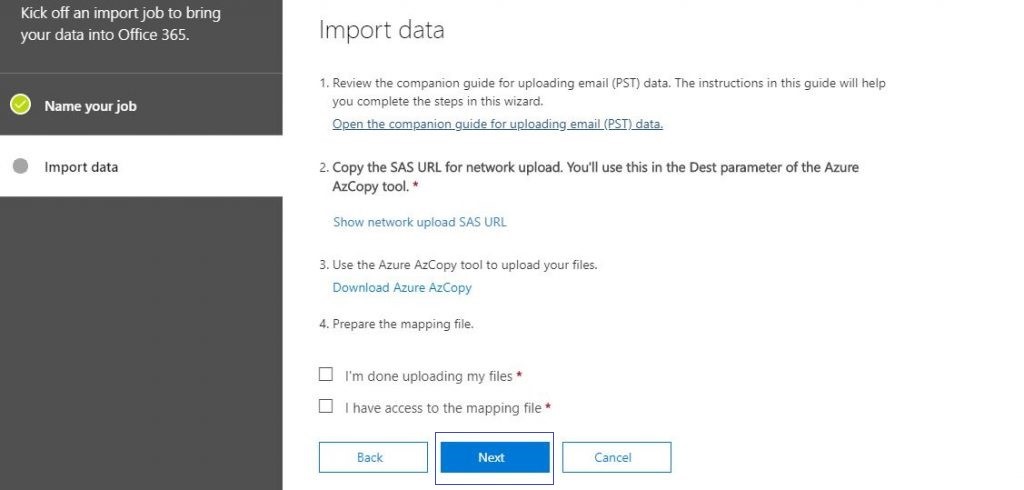
On the Overview porter, we’ll find the SAS URL we’ll need later and a download link for the most recent version of the Azure AzCopy utility. Copy the SAS URL after downloading and installing the Azure AzCopy programme.
Preserve the SAS URL private, enabling you to access the Azure storage where all of your PST files are stored.
You can leave the screen open or click Cancel and return later.
Using the Azure AzCopy tool to upload the PST file:
Once the Azure AzCopy tool is set up, you can open it. The utility is just a command-line programme that lets you comprehend how to import PST to Office 365.
The upload tool will import all the.pst files into the root directory. It is not viable to choose just one.pst file. So, if you want to test it with one file, put it in a separate folder.
The files are uploaded with the following command: AzCopy copy “/path/to/pstfiles” <SAS URL> –recursive=true
If PST (.pst) files are also in subfolders, you can choose the recursive configuration with the —recursive=true to switch.
Make sure that the source and target paths are in quotes. If you don’t, you’ll get an error message saying that the syntax is wrong.

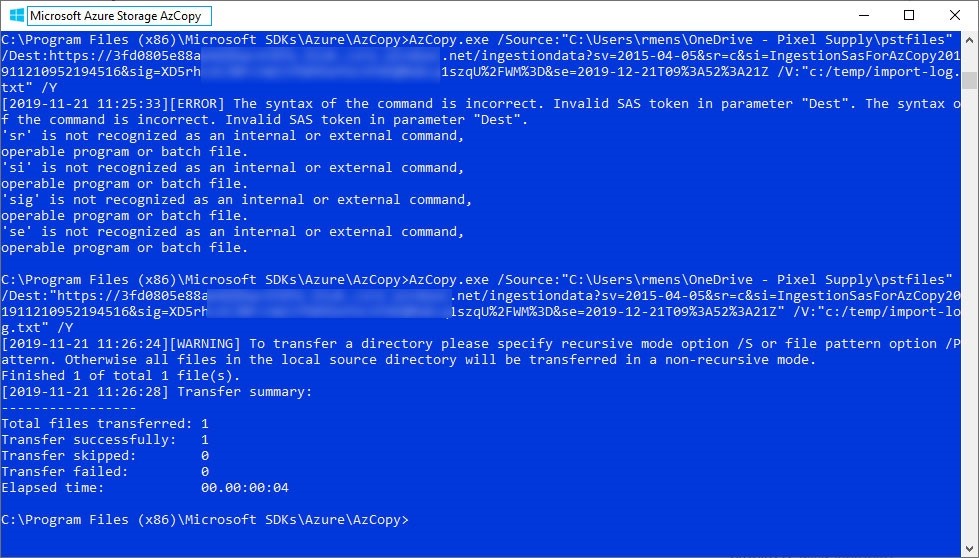
Relying on how big the files are, it may take a while to upload the PST files.
Verifying the PST files that were sent (if required):
After uploading the files, you can check all the.pst files uploaded to Azure Storage. Get the Azure Storage Explorer and put it in place.
Once you’ve opened Storage Explorer, you’ll have to add an account to import PST to Office 365.
- Go to the Create, so click Add an account here.
- Now choose – Use a shared access signature (SAS) URL
- We got the SAS URL from the import job.
- Go with the Next and Connect

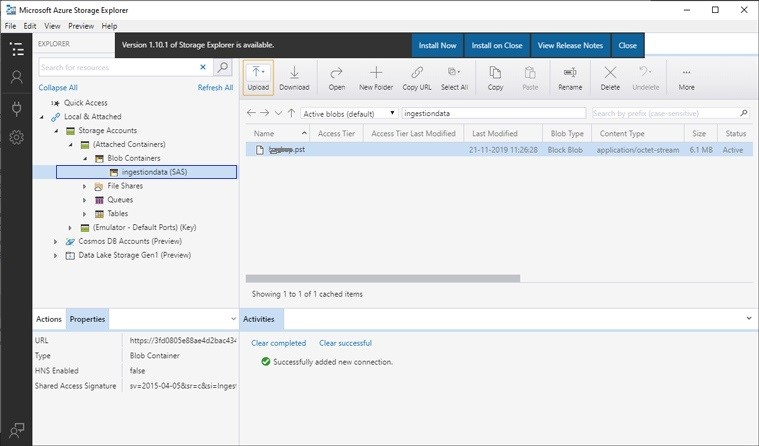
After checking the PST files, you can close the Storage Explorer. Right-click the ingestion data in the explorer and click “Detach” to disconnect. If you don’t, you’ll get an error when you try to open it again.
Placing PST files in the proper map:
In this step, map the PST file in the Office 365 mailbox. You can import PST to Office 365 with a CSV file. You can get a template for it here from Microsoft.
Getting the job done:
The import job can be completed until you have mapped all the desired PST files. Open the import job by going back to protection.office.com.
- Pick I’m done uploading my files; choose I have access to the mapping file.
- Click the Next button by assigning the mapping file (CSV file)
- Click on the Validate button to ensure the CSV file is Validate.
- When the validation is done, click Save to make sure.
Afterwards, this can take a few moments or longer, depending on the object’s size. To track the availability, just click “Refresh.”
You could now filter the data so that you only see emails based on years old or have the user in the CC field. When you are accomplished filtering, but if you’d like to import it all, click on Import data to form the import task finally.
Note: The import job itself may take a while. Not everyone can do it easily with this method. If you want to use this method to import PST to Office 365, you should know what challenges it can cause. A little error may result in workflow failure or inaccuracies import.
Using a Specialized PST to Office 365 migration tool
Many third-party tools can simplify how to import PST to Office 365. One of these tools is Shoviv PST to Office 365 migration software, which does a great job more effortlessly and securely. It also has incremental import built-in. Because it has a simple interface, users from non-technical fields can also use this software efficiently. Its easy actions and user-friendly features make it a convenient migration solution.
Key-feature of Shoviv’s tool:
- Compatible among all Windows OS editions..
- Let you use PST files from both older and newer editions of MS Outlook.
- Process so many PST files of any size at the same time.
- Import by increments for new and revised data without duplication; even resume the process that gets interrupted.
- Willingness to extract items to import only desired PST data to Office 365 based on message class or date filter.
- More advanced built-in options are -Folder Mapping and Email Translation.
Final Words:
Consequently, I hope this article helped you figure out how to import PST to Office 365 efficiently. If you want to test the Shoviv PST to Office 365 migration tool with a few mailboxes, you can use the free trial version and look at the first 50 items per folder. So, you can make sure everything works as planned and evaluate the migration time.